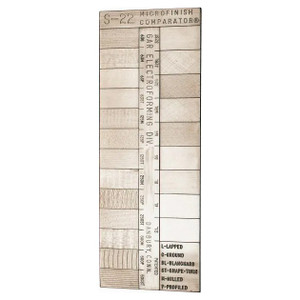
GAR Surface Finish Comparators S-22
2 to 500 micro Inch Surface Finish, Nickel, Surface Finish Comparator
22 Specimens, 5-3/8 Inch Overall Length x 2 Inch Overall Width, Includes Instructions and Case
Features:
- Conventional machining microfinish comparator:
- Twenty-two replicated machined surface finish specimens with examples of six different machining processes calibrated in microinches (μ).
- Supplied in a leatherette case with instructions & engineering data.
- Machined surface microfinish comparator.
Twenty-two replicated machined surface finish specimens with examples of six different machining processes: lapped, ground, blanchard ground, shape-turned, milled and profiled- ranging from 2 to 500 microinches.
The S-22 MICROFINISH COMPARATOR Surface Roughness Scale is made by a dual electroforming process wherein nickel is electrodeposited to provide an exact reproduction in intricate detail. The same electroforming process used to produce the Surface Roughness Scale is available from GAR Electroforming to serve your products needs.
The surfaces used in this scale are reproductions of accurately machined surfaces measured in microinches (millions of an inch - 0.000001"). The numbers engraved alongside each surface are the average deviation from the mean surface expressed in microinches.
Place the MICROFINISH COMPARATOR Surface Roughness Scale alongside your work piece. Slide the scale so that the rectangle with the surface roughness you want is adjacent to the piece you are examining. Compare by drawing the tip of the fingernail across each surface at right angles to the tool mark. The feel of the fingernail contact must be the same if the finishes are identical.
The S-22 MICROFINISH COMPARATOR Surface Roughness Scale provides industry with established flat surface roughness specimens for visual and tactual comparison. It is used in specifying and controlling surface roughness when a product having the appearance of typically machined surfaces is required.
The S-22 MICROFINISH COMPARATOR Surface Roughness Scale provides an economical tool which permits roughness to be specified on the same basis as linear measurements. The surfaces presented are the result of years of research and engineering. Details covering this subject are now published in The American National Standards Institute (ANSI) specification titled: "Surface Texture, Surface Roughness, Waviness and Lay." ANSI/ASME B46.1
The S-22 Conventional Machining MICROFINISH COMPARATOR is rectangular in shape (2" x 5 3/8") and is a corrosion resistant electroformed nickel duplicate of actual machined surfaces.
There are twenty two replicated machined surface finish specimens with examples of six different machining processes: lapped, ground, blanchard ground, shape-turned, milled and profiled - ranging from 2 to 500 microinches.
The S-22 MICROFINISH COMPARATOR is supplied in a leatherette case with engineering data and instructions.
The S-22 is also available in metric with micrometer designations.
Specifications:
| Type of Process | Finish Range Gaged (μ) |
| Lapping | 2, 4, 8 |
| Blanchard Grinding | 16, 32 |
| Conventional Grinding | 8, 16, 32, 63 |
| Shape Turning | 32, 63, 125, 250, 500 |
| Milling | 63, 125, 250, 500 |
| Profiling | 63, 125, 250, 500 |
| Machining Process | Blanchard Grinding; Grinding; Lapping; Milling; Profiling; Shape Turning |
| Minimum Surface Finish (micro Inch) | 2.0000 |
| Maximum Surface Finish (micro Inch) | 500.0000 |
| Number of Specimens | 22 |
| Includes Instructions | Yes |
| Includes Case | Yes |
| Overall Length (Inch) | 5-3/8 |
| Overall Width (Inch) | 2 |
| Material | Nickel |
| Includes | 2 to 500 µ Inch Lapping, Blanchard Grinding, Grinding, Milling, Profiling, Shape Turning |
For more info, visit www.p65warnings.ca.gov.


